Up(sun) and Running with Forem

Overview
This guide provides instructions for deploying and working with Forem, an “open-source software for building modern, independent, and safe communities” on Upsun, by Platform.sh. If you’re not familiar with Forem, it’s the platform that powers DEV.to and is built using Ruby on Rails. Installing Forem manually is not for the faint of heart, and even it’s own docs state:
“Please note that Forem is a complex piece of software, and hosting and managing it in a cloud environment is non- trivial. “
But I’m always up for a good challenge! So, before we dive in, let’s establish some assumptions that we’ve made about you to ensure you can follow this guide successfully:
- You have an account set up on Upsun.com and the necessary permissions to create a new project
- You have the Upsun CLI installed
- You have authenticated in the CLI
- You have named your application
myapp
Setting up the application and repository
To start, we need to clone the Forem repository. From a terminal/command prompt, clone the repo locally:
git clone https://github.com/forem/forem && cd foremThe repository is fairly large, so it may take some time. Take this opportunity to grab yourself a drink and stay hydrated for the remaining steps.
Once it has finished cloning, we now need to set up some base Upsun configuration files. In your terminal, start the project initialization:
upsun project:initThe CLI will prompt you for some information about your project. Since Forem is built on Ruby on Rails, we’ll need to select Ruby. Next, it will prompt us for the project’s name and lastly, the services we need. In this case, select PostgreSQL and Redis Persistent.
upsun project:init
Welcome to Upsun!
Let's get started with a few questions.

We need to know a bit more about your project. This will only take a minute!

What language is your project using? We support the following: [Ruby]

✓ Detected dependency managers: Yarn
Tell us your project's application name: [myapp]


                       (\_/)
We're almost done...  =(^.^)=

Last but not least, unless you're creating a static website, your project uses services. Let's define them:
Select all the services you are using:
Use arrows to move, space to select, type to filter
> [ ]  MariaDB
  [ ]  MySQL
  [x]  PostgreSQL
  [ ]  Redis
  [x]  Redis Persistent
  [ ]  Memcached
  [ ]  OpenSearch
After selecting your services and hitting enter, the Upsun CLI will generate two new files for you:
.environmentin the root of the Forem repository and a new directory.upsunwith a single file inside namedconfig.yaml
Now go ahead and follow the CLI’s instructions to git add and git commit.
Ruby Version
We’re still not done. These two files require a few more changes to get Forem up and running. In your favorite IDE,
open up .upsun/config.yaml. Scroll down to the type key and change it from ruby: 3.2 to ruby: 3.3. Not only do
we want Forem running on the latest version of Ruby, but Forem also requires it in the .ruby-version file.
At the time of this writing, Forem pinned the Ruby version to 3.3.0. However,
new ruby images in Upsun are released on a regular basis to apply security patches.
To avoid issues when such updates are performed, let’s update the .ruby-version file to use ruby ~>3.3. Please
note that if or when you update your clone of Forem from the upstream, if they have updated the .ruby-version file, you
Project configuration adjustments
Container Profile
Ruby images by default are assigned
a container_profile of HIGH_CPU while new projects are assigned a
resource size of 0.5 by default,
giving us a mere 224 MB of memory for our Forem app. This is not nearly enough for it to start up and function correctly.
So for now, we’ll adjust the container profile to BALANCED to give
Forem 1088 MB of memory while keeping our 0.5CPU.
In the .upsun/config.yaml file scroll down to the key container_profile: key which will be commented out. Remove the
comment indicator (#) and update the key to container_profile: BALANCED.
applications:
  myapp:
    source:
      root: "/"
    <snip>
container_profile: BALANCED# as well as the extra
space. If you don’t remove the extra space, you will end up with an Invalid block mapping key indent error when the
configuration file is validated.Writable locations
By default, the file system in app containers in Upsun is read-only, but Forem requires the ability to write to a
collection of known locations. To address this, we’ll need to add a series of writable mounts into the application
container. In the .upsun/config.yaml file, scroll down to the mounts: key (currently commented out), uncomment it,
and add the following mounts:
applications:
  myapp:
    source:
      root: "/"
    <snip>
    mounts:
      /tmp:
        source: tmp
        source_path: tmp
      /public/uploads:
        source: storage
        source_path: uploads
      /public/images:
        source: storage
        source_path: images
      /public/podcasts:
        source: storage
        source_path: podcasts
      /public/packs:
        source: storage
        source_path: packs
Serving Forem
Now we need to instruct Upsun on how we want to serve the Forem application.
Forem uses Puma as the web server, so
inside .upsun/config.yaml , scroll down to the sub key web:commands:start. Replace the current contents of start:
with:
applications:
  myapp:
    source:
      root: "/"
    <snip>
    web:
      commands:
        start: "bundle exec puma -e production"
We don’t need to alter the upstream or upstream:socket_family keys
from their defaults, so scroll
down and either remove those keys or comment them out.
Next, we need to update the
locations key (also a sub-key
of web) to the correct root. Since we just added several mounts that will contain uploaded files we’ll want to be
able to access later, let’s go ahead and add a couple of extra properties to this location: allow (to serve files that
don’t match a specific rule)1, and expires (how long to cache static assets). Update locations to:
applications:
  myapp:
    source:
      root: "/"
    <snip>
    web:
      commands:
      <snip>
      locations:
        "/":
          root: public
          passthru: true
          allow: true
expires: 5mallow to false and then add
matching rules for the assets you want to serve. See
https://docs.upsun.com/create-apps/app-reference/single-runtime-image.html#rulesBuilding the application container
We’re now ready to define how we want our application container to be built out. The build hook will require several steps. Here is the entirety of the build hook2, then I’ll go over each part:
applications:
  myapp:
    source:
      root: "/"
    <snip>
    hooks:
      build: |
        set -eux
        n auto && hash -r
        export BUNDLER_VERSION="$(grep -A 1 "BUNDLED WITH" Gemfile.lock | tail -n 1)"
        gem install --no-document bundler -v $BUNDLER_VERSION
        [ -d "$PLATFORM_CACHE_DIR/bundle" ] && \
          rsync -az --delete "$PLATFORM_CACHE_DIR/bundle/" vendor/bundle/ || \
          mkdir -p "$PLATFORM_CACHE_DIR/bundle"
        bundle lock --add-platform x86_64-linux
        bundle install --jobs=4
        rsync -az --delete vendor/bundle/ "$PLATFORM_CACHE_DIR/bundle/"
        yarn add ahoy.js
        mkdir -p public/assets
bundle exec rails assets:precompile bash build.sh vs ./build.sh )Build steps explained
set -eux
Using the set builtin, exit (e) immediately if a pipeline, simple/compound command, or list does any of the following:
- returns a non-exit code
- treats unset (
u) variables as an error when performing parameter expansions - prints a trace of simple commands,
forcommands,casecommands,selectcommands, and arithmeticforcommands and their arguments or associated word lists after they are expanded (x) and before they are executed.
n auto && hash -r
Set the node version based on the contents of the .nvmrc file and reset shell’s cache of utility locations.
export BUNDLER_VERSION="$(grep -A 1 "BUNDLED WITH" Gemfile.lock | tail -n 1)"
Grab the bundler version from the Gemfile.lock file and set it as the shell variable BUNDLER_VERSION (which we’ll
use in the next step).
gem install --no-document bundler -v $BUNDLER_VERSION
Install the specific version of bundler as defined by $BUNDLER_VERSION
[ -d "$PLATFORM_CACHE_DIR/bundle" ] && \
   rsync -az --delete "$PLATFORM_CACHE_DIR/bundle/" vendor/bundle/ || \
   mkdir -p "$PLATFORM_CACHE_DIR/bundle"
If the directory bundle exists in PLATFORM_CACHE_DIR location, sync its contents into vendor/bundle, deleting
any extraneous files from the vendor/bundle directory. Otherwise, create the directory bundle in the
PLATFORM_CACHE_DIR location. This allows us to have our dependencies cached for future builds, thereby speeding up the
build process.
bundle lock --add-platform x86_64-linux
Because the Gemfile.lock file might have been generated on a different platform, we could end up missing dependencies
that we need for the linux platform. Update the Gemfile.lock file by adding any gems that are needed for linux.
bundle install --jobs=4
Install our dependencies from the updated Gemfile.lock file
rsync -az --delete vendor/bundle/ "$PLATFORM_CACHE_DIR/bundle/"
Sync the contents from vendor/bundle back into "$PLATFORM_CACHE_DIR/bundle/" so they’re available for the next build.
yarn add ahoy.js
Add the ahoy library for the frontend. Ahoy is used for visit and event tracking in Forem.
mkdir -p public/assets
The next step will compile our assets, so we need to make sure we have an assets directory for them to be placed into.
bundle exec rails assets:precompile
This allows us to compile all the assets as defined in config.assets.precompile.
Once the build hook is completed, we’ll have everything generated and ready for our Forem application.
Container deployments
The next step is to define the things that need to happen for each deployment. In the .upsun/config.yaml
file, scroll down until you find the deploy: key. Remove the commented line, and replace it with:
applications:
  myapp:
    source:
      root: "/"
    <snip>
    hooks:
      <snip>
      deploy: |
        set -eux
        if [ ! -d 'tmp/pids' ]; then
          mkdir tmp/pids
        fi
        #bundle exec rake db:migrate
bundle exec rake db:migrate
Normally, during the deploy stage, we would apply any database changes that need to happen. However, you’ll notice that this is commented out. As of right now we haven’t set up our database, so if we were to go ahead and push this code to Upsun, our migrations would fail. We’ll uncomment it here in a bit.
Workers
Finally, we need to define our worker. Scroll up from the deploy: key. Right before you get back to the locations
key, you should see a commented key for workers. Uncomment it, and update it to:
| |
With that added, we can finally add and commit our changes in this file to git.
git add .upsun/config.yaml && git commit -m "adds remaining changes to config"Leverage environment variables
Next up, we need to make some modifications to the generated .environment file. Specifically, we need to add several
of the items as defined in .env_sample. Open the .environment
file and scroll down to the space between the database-related environment variables and the redis-related variables.
upsun project:init generated the bulk of what we need for the database, minus two. Just after the line for
export DATABASE_URL, add the following:
export DATABASE_NAME="${DB_PATH}"
export DATABASE_POOL_SIZE=5
Move to just below the redis-related values and add:
export REDIS_URL="${CACHE_URL}"In both cases, we’re just remapping existing values to environment variable names that Forem is expecting, with
DATABASE_POOL_SIZE coming straight from the .env_sample file.
For the remaining additions, feel free to add them at any location in the file. As this file will be committed to your
repository, for any that contain values that you are not comfortable storing in the repository (e.g. DEFAULT_EMAIL),
you can instead create them as
project variables, either in
the CLI or in the Upsun console.
Next, we need to define the domain where our instance of Forem is running via the APP_DOMAIN environment variable.
When you create a preview environment, not only will Upsun clone the data from your production environment, it will also
generate an ephemeral URL for you to use. In order for Forem to operate in this preview environment, the value in
APP_DOMAIN will need to point to this new domain. Lucky for us, Upsun provides a
series of environment variables
to inform our app about its runtime configuration, including the new domain(s). In your .environment file, add the
following:
PRIMARY_URL=$(echo $PLATFORM_ROUTES | base64 --decode | jq -r 'to_entries[] | select(.value.primary == true) | .key')
export APP_DOMAIN=$(echo "${PRIMARY_URL}" | awk -F '[/:]' '{print $4}')
export APP_PROTOCOL="https://"
We’ll retrieve the primary URL for this preview environment from the PLATFORM_ROUTES environment variable. However,
this is the full URL and not just the domain, so we’ll use awk to retrieve the domain and set it to APP_DOMAIN.
All URLs on Upsun are https, so we’ll set APP_PROTOCOL to https.
The next round of environment variables we need to set have to do with secrets, so these values need to be random and secure.
Once again, Upsun has provided us with something we can use for this very purpose:
PLATFORM_PROJECT_ENTROPY.
In your .environment file, add the following:
export FOREM_OWNER_SECRET=$PLATFORM_PROJECT_ENTROPYNext, we need to let both Rails and Node know which environment type we’re running in so they can load the appropriate
configuration files (e.g. from config/environments). In Upsun, we can tell which environment type we are in via the
PLATFORM_ENVIRONMENT_TYPE environment variable.
"production".In your .environment file, add the following:
export RAILS_ENV="${PLATFORM_ENVIRONMENT_TYPE}"
export NODE_ENV="${PLATFORM_ENVIRONMENT_TYPE}"
The next two values will be specific to your Forem instance:
- Community name
- Default email address
export COMMUNITY_NAME="Up(sun) and Running with Forem"
export DEFAULT_EMAIL="upsun.user@upsun.com"
The remaining values (with one exception) come directly from the .env_sample file:
export RAILS_MAX_THREADS=5
export WEB_CONCURRENCY=2
export RACK_TIMEOUT_WAIT_TIMEOUT=100_000
export RACK_TIMEOUT_SERVICE_TIMEOUT=100_000
export SESSION_KEY="_Dev_Community_Session"
# two weeks in seconds
export SESSION_EXPIRY_SECONDS=1209600
export HONEYBADGER_API_KEY="testing"
export HONEYBADGER_JS_API_KEY="testing"
export HONEYBADGER_REPORT_DATA=false
The one value that is not originally from .env_sample is HONEYBADGER_REPORT_DATA. Honeybadger is an application
monitoring service that Forem uses for reporting application errors. If you do not have a Honeybadger API key, or do not
want to report data back to Honeybadger, leave it set to false. If you decide to use this service, you will need to
change or remove this value and fill in the remaining HONEYBADGER_* sections with your data.
As promised, here is the .environment file in its entirety (line breaks removed):
# Set database environment variables
export DB_HOST="$POSTGRESQL_HOST"
export DB_PORT="$POSTGRESQL_PORT"
export DB_PATH="$POSTGRESQL_PATH"
export DB_USERNAME="$POSTGRESQL_USERNAME"
export DB_PASSWORD="$POSTGRESQL_PASSWORD"
export DB_SCHEME="postgresql"
export DATABASE_URL="${DB_SCHEME}://${DB_USERNAME}:${DB_PASSWORD}@${DB_HOST}:${DB_PORT}/${DB_PATH}"
export DATABASE_NAME="${DB_PATH}"
export DATABASE_POOL_SIZE=5
# Set Cache environment variables
export CACHE_HOST="$REDIS_PERSISTENT_HOST"
export CACHE_PORT="$REDIS_PERSISTENT_PORT"
export CACHE_SCHEME="$REDIS_PERSISTENT_SCHEME"
export CACHE_URL="${CACHE_SCHEME}://${CACHE_HOST}:${CACHE_PORT}"
export REDIS_URL="${CACHE_URL}"
PRIMARY_URL=$(echo $PLATFORM_ROUTES | base64 --decode | jq -r 'to_entries[] | select(.value.primary == true) | .key')
export APP_DOMAIN=$(echo "${PRIMARY_URL}" | awk -F '[/:]' '{print $4}')
export APP_PROTOCOL="https://"
export FOREM_OWNER_SECRET=$PLATFORM_PROJECT_ENTROPY
export SECRET_KEY_BASE=$PLATFORM_PROJECT_ENTROPY
export RAILS_ENV="${PLATFORM_ENVIRONMENT_TYPE}"
export NODE_ENV="${PLATFORM_ENVIRONMENT_TYPE}"
export RAILS_MAX_THREADS=5
export WEB_CONCURRENCY=2
export COMMUNITY_NAME="Up(sun) and Running with Forem"
export DEFAULT_EMAIL="upsun.user@uppsun.com"
export RACK_TIMEOUT_WAIT_TIMEOUT=100_000
export RACK_TIMEOUT_SERVICE_TIMEOUT=100_000
export SESSION_KEY="_Dev_Community_Session"
# two weeks in seconds
export SESSION_EXPIRY_SECONDS=1209600
export HONEYBADGER_API_KEY="testing"
export HONEYBADGER_JS_API_KEY="testing"
export HONEYBADGER_REPORT_DATA=false
Now we can finally add and commit this file!
git add .environment && git commit -m "adds forem specific environment variables"Create the Upsun project
Before we can deploy our application, we’ll need to create a new project on Upsun. To do so, we’ll type the command below into command line:
upsun project:createThe CLI tool will now walk you through the creation of a project asking you for your organization, the project’s title, the region you want the application housed, and the branch name (use the same one you set earlier). For now, allow the CLI tool to set Upsun as your repository’s remote, and then select Y to allow the tool to create the project. The Upsun bot will begin the generation of your Upsun project and once done, will report back the details of your project including the project’s ID, and URL where you can manage the project from the Upsun web console. Don’t worry if you forget any of this information, you can retrieve it later with:
upsun project:infoAnd you can launch the web console for your project at any time by doing the following:
upsun webFirst push
We’re finally to the point where we can push our repository to Upsun and have it perform the first build:
upsun pushThis first push will take a few minutes, so take advantage of the opportunity to grab yourself something to drink.
Once the build and deploy is complete, the CLI will report back the URLs assigned to your project. While I know it’s exciting, we’re not quite ready to visit our site. We have a few remaining tasks that need to be completed.
Finish setting up the database
Forem uses Hypershield to hide sensitive information, which requires its own schema. In a moment we’ll need to alter roles for our PostgreSQL user, so we need to make sure we have the correct user name. From the command line:
upsun relationships -P postgresql | grep usernameThis will return the username property. By default the username is main, but we want to make sure before proceeding.
The remaining database changes come directly from
Hypershield’s setup documentation, so feel
free to refer to them if you have questions, or run into issues. From the command line:
upsun sqlThis will connect us to our PostgreSQL database instance, dropping us into a PostgreSQL session (from here on I’ll refer to it as “ps session”).
upsun sql
psql (16.2 (Debian 16.2-1.pgdg120+2), server 15.6 (Debian 15.6-1.pgdg110+2))
Type "help" for help.

main=>
First thing we need to do is to create a schema for Hypershield. In your ps session:
main=> CREATE SCHEMA hypershield;Once it verifies the schema has been created, we need to grant privileges to the user account we verified earlier
(main). If the postgresql username for your instance is different, update main to the correct username. In your ps
session:
main=> ALTER DEFAULT PRIVILEGES FOR ROLE main IN SCHEMA hypershield GRANT SELECT ON TABLES to main;Last, alter the role. In your ps session:
main=> ALTER ROLE main SET search_path TO hypershield, main, public;Go ahead and exit the ps session:
main=> exitNow that our database schemas are set up, we need to have Forem set up the database. We’ll need to run several steps from inside the application container, so go ahead and ssh into it:
upsun sshFirst we need to have rails create all the necessary tables. Normally it will refuse to do this in a production environment, so we’ll instruct it to bypass the environment checks. In your ssh session, run:
DISABLE_DATABASE_ENVIRONMENT_CHECK=1 bin/rails db:schema:loadOnce that is complete, we need to run our database migrations that we commented out in our deploy hook previously. In your ssh session, run:
bundle exec rake db:migrateNow we’re finally ready to set up our Forem site! But before you exit your ssh session and head over to the site, we’re
going to need the forem owner secret in order to create our administrator account. Earlier we set this to be equal to
PLATFORM_PROJECT_ENTROPY so while we’re here, let’s print the value and copy it so we can use it in the next step.
In your ssh session, run:
printenv | grep OWNER_SECRETCopy the value assigned to FOREM_OWNER_SECRET. Now you can exit your ssh session and visit your site to begin the
Forem set up!
Forem setup
We can finally start setting up our Forem instance. To do that we need to visit our new site in a browser. If you don’t remember the site’s URL, you can run the following command in terminal:
upsun url --primaryWhich will open your project’s URL in your browser.
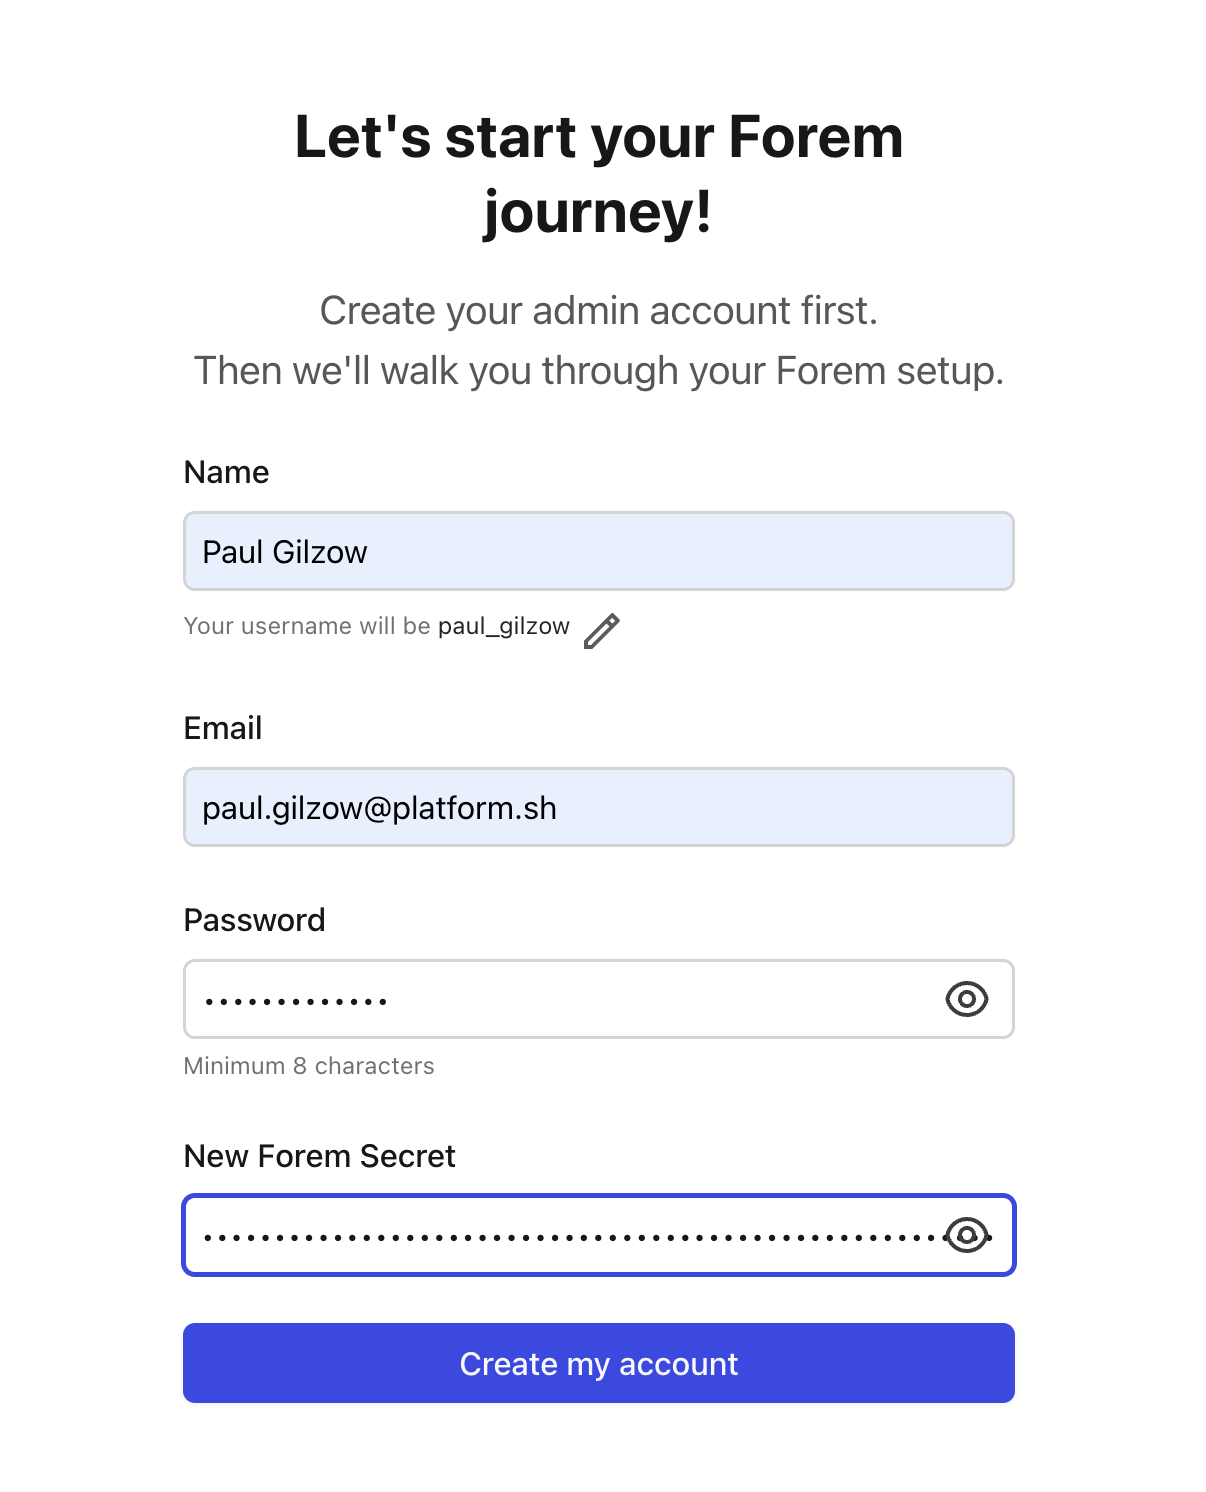
In your browser, click on Create account in the upper right. Set up your name, email address, password, and for
“New Forem Secret” paste in the value we copied earlier for FOREM_OWNER_SECRET. Click on Create my account.
Forem will now have you set up a few more specifics (Community name, logo, brand color, etc). Fill out the relevant information, agree to the terms at the bottom, and click Finish.
Your Forem site is now up and running! But we’re not quite done yet.
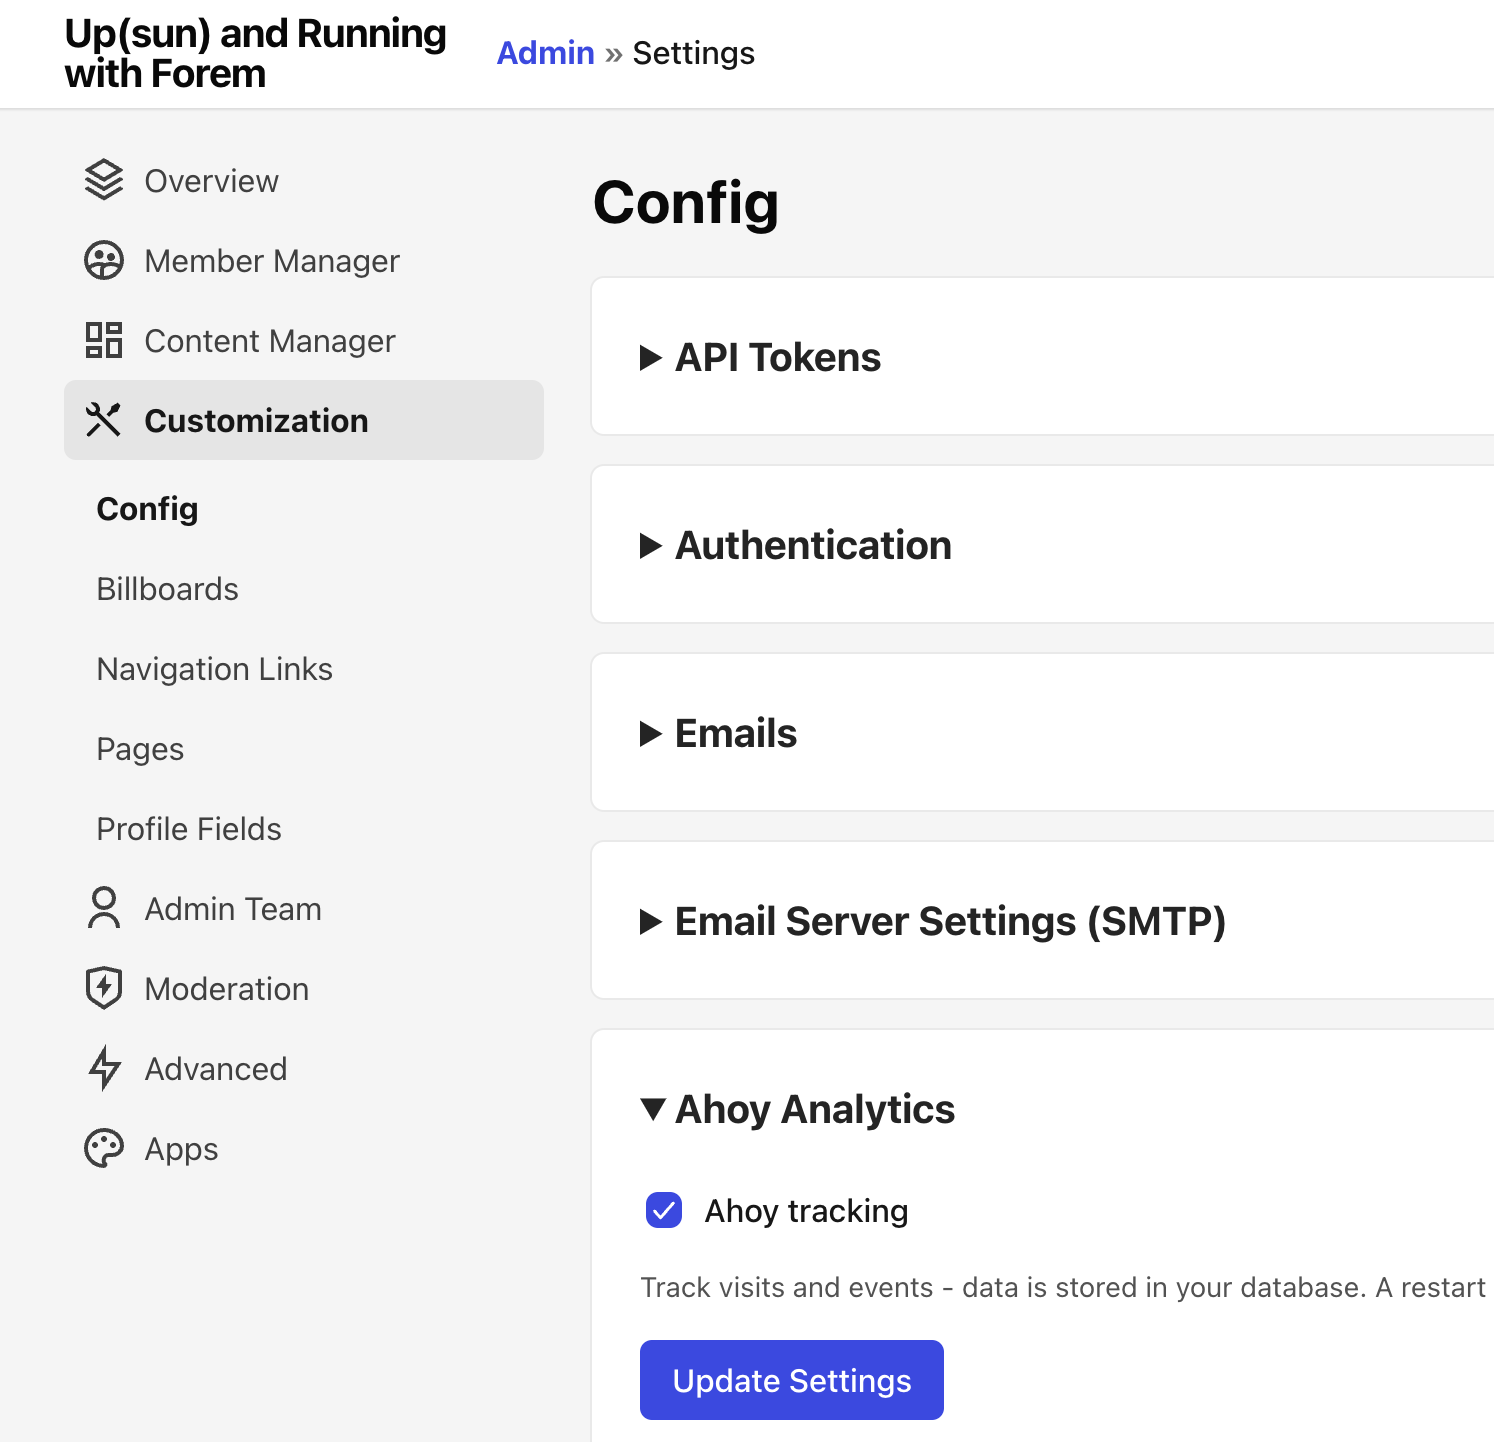
We still need to enable Ahoy, or our tracking won’t work correctly. In the upper right corner, click on your avatar, and then “Admin”. On the left hand side, click on Customization. In the resulting Config page, expand the section for Ahoy Analytics. Check “Ahoy tracking” and then click Update Settings.
We now need to restart rails. Back in your terminal, ssh back into the app container, and then run the following to restart rails:
bin/rails restartAt this point we’re ready to re-enable database migrations. Back in the .upsun/config.yaml scroll back down the
deploy: key, and uncomment:
bundle exec rake db:migrateFinally, add and commit the change, then push to Upsun!
> git add .upsun/config.yaml && git commit -m "enable db:migrations during deploy" && upsun push -yOnce this deployment completes, you’ll be fully Up(sun) and running with Forem!
All example files
All the example files referenced in the article above are available in our Upsun Snippets repository.