How to update your PostgreSQL database without downtime

Some background
On paper, releasing a new version of your application that requires upgrading the schema of the database is straightforward. But, changes of code and schema can not be updated in an atomic way, you only need to take care that old code is not performing a query against new schema, and reciprocally.
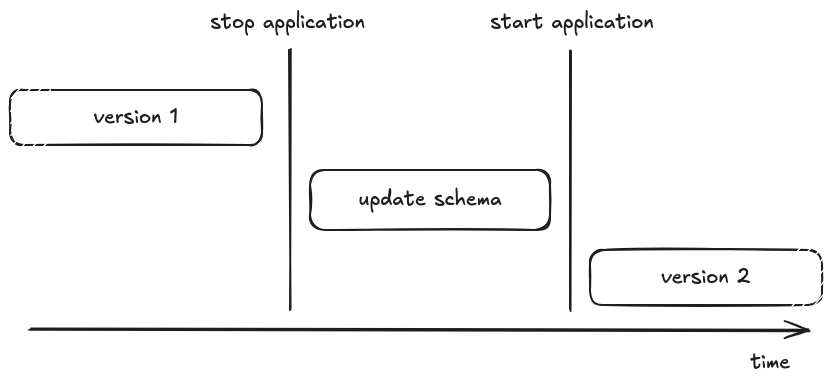
The simple solution is to stop the old version during the schema’s upgrade:
- Upload the new source code
- Stop the old version of the application
- Upgrade the schema of the database (a.k.a execute migrations), if needed
- Start the new version of the application
- Celebrate
This can be represented like this:
This is simple but requires stopping the application, which means that during the deployment, users will get an error page (or in the best case a pretty maintenance page). Your application is down, you are not selling anything, you are losing money, and users are angry.
To avoid the downtime, you can tell your router (or load balancer) to hold the HTTP connections during the deployment – this is how Platform.sh and Upsun handle your deployments.
This works well, but requires a complex infrastructure setup (that Platform.sh takes care of for you). It also has a drawback: While updating, visitors get a “loading spinner”. When the update is really fast, it’s not an issue, but when it takes several seconds, it starts to be noticeable, and if it reaches a timeout it might lead to an error page.
This is the problem zero-downtime deployment solves, by defining how and in which order you should perform individual tasks to avoid down time.
The topic is wide, and for simplicity, this article will focus only on database schema updates. It will not cover other parts like the deployment strategy (blue/green, canary, …), NoSQL/Schema less database migration, API compatibility (mobile devices, SDK, …), stateful storage (shared cache / session / cookies, queues, …), etc.
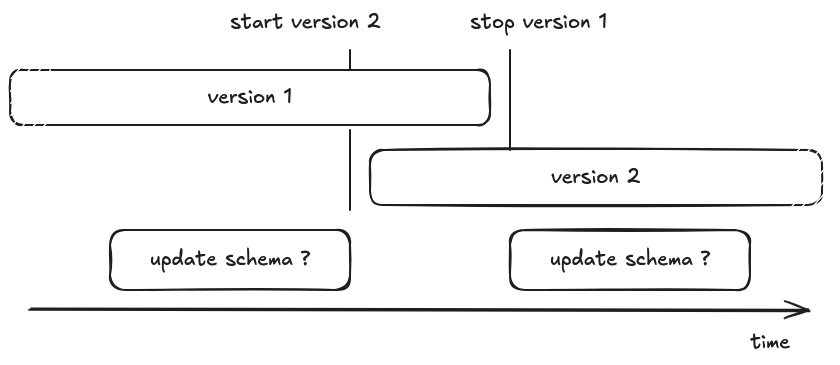
Whatever the deployment strategy you are using (blue/green, canary, rolling update, …), the goal is always the same: you have at any time, at least one running version of the application. The important word here is “at least”, because the application’s versions can not toggle, flip, or upgrade in an atomic way: at some point in time, you are running multiple versions of your application in parallel.
Even with a toggle strategy (like blue/green), there is a chance that your application starts handling a request in version 1, then the deployment switches to the new version, and a second request starts on version 2 while the first one is not finished yet. It does not matter if it’s a few seconds or hours, we have to deal with that.
So let’s update our strategy and start version 2 before stopping version 1. Now the question:
“Should I run the database migration before, or after updating the code?”
Running the migration before the deployment has a great advantage: the new code knows that the schema is up to date, and can use it. You can put code and database changes into the same release.
The drawback: to run the migration you need the files that contain the queries. And, if your code and migration files are packaged together, to get these files, you need to deploy the new code. So you kinda started deploying the application and you’re not really running the migration BEFORE the deployment. Also, if the migration fails, your deployment should stop/revert and prevent exposing the new code to users.
To solve this issue, it’s simpler to separate code release from migration release. In that way, you don’t care if the migration is run before or after the code’s update. Changes are just not related to each other. It’s easier to separate the 2 deployments and understand changes step by step, which also allows you to fix and rerun failed migrations.
So, our previous strategy can now be updated to something like this:
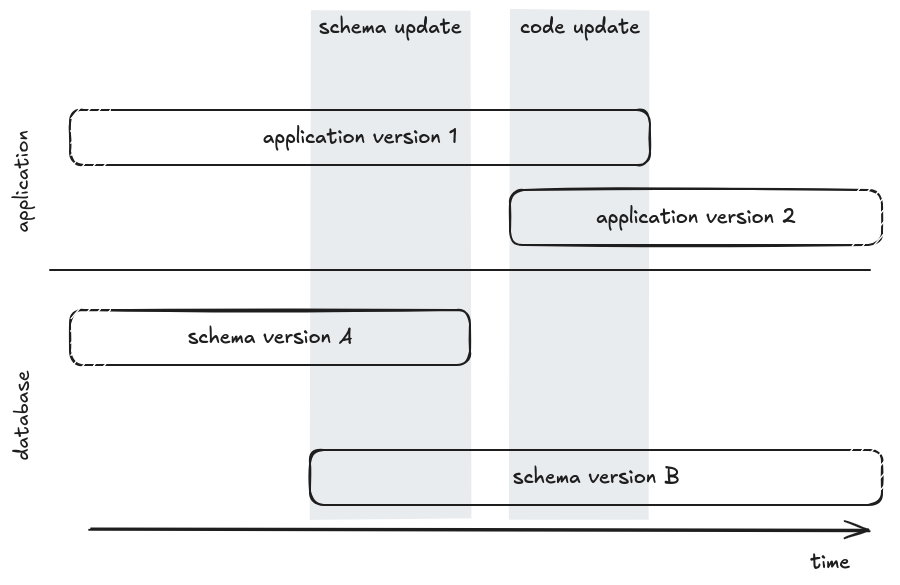
Generate a BC schema
In order to not break the running application, the most important thing to understand is that the code running in production must be compatible with the next version of the schema of the database. That means you can not drop or rename a table or column if it’s still used, you cannot add a non-nullable column, and so on.
If you need to update your application in a way that requires changing the schema of the database, you’ll need to split the changes and perform intermediate releases to prepare the schema before updating the code, then clean the schema in the final form.
To reduce the cognitive load, we’ll use an ORM pattern, where code is tightly coupled to the database schema.
The code uses entities (represented by a class) mapped to a database’s table.
Each entity has properties (represented by class’ variables) mapped to a table’s column.
Here are the main different situations you have to deal with:
- Adding a new entity/table
- Deleting an entity/table
- Renaming an entity/table
- Adding a new property/column
- Removing a property/column
- Renaming a property/column
Disclaimer:
The below recommendations concern a PostgreSQL database, and relies on PostgreSQL’s internal capabilities (like transaction in schema modifications, partial locking mechanism). Most of rules can be applied to other RDBMS (MySQL, …) or Database (Elasticsearch, MongoDb) but should be adapted to their specificities and capabilities.
Adding a new entity/table
Probably the easiest case, you need 2 releases, first create the table and then use it in the code.
- [migration] Create the table
- [code] Create the entity and use it
Deleting an entity/table
You first need to stop using the entity in your application, which might require removing relationship properties (ie. one-to-many, …). In such a situation, first follow Delete a property (see below) to drop them.
- [code] Delete entity from code
- [migration] Drop the table
Renaming an entity/table
You can not rename a table without breaking the code running in production, you need to perform the migration in multiple steps, create a new table, fill it, and then delete the old one
- [migration] Create the table
- [code] Update the code to insert/update/delete in both tables (alternatively use triggers for this)
- [migration]
- Backfill missing value by using data from the OLD table (⚠️ beware of perf, see next chapter)
- Alter all foreign keys to target the NEW table (⚠️ beware of perf, see next chapter)
- [code] Update code to read from the NEW table, and remove usage of OLD table
- [migration] Drop the OLD table
Adding a new property/column
This case depends if the property can be nullable or not. Because you can not add a non-nullable column to the table, the code in production is not aware of the property and might perform insert statements without the column: the database will try to use a null value, breaking the constraint and leading to an exception. This can be avoided with DEFAULT values, but this should be treated with caution (see next chapter about locks)
Adding a nullable property
- [migration] Alter the table to add the column with nullable option
- [code] Add the property in the entity and use it
Adding a non-nullable property with a known default
- [migration] Alter the table to add the column with default value option (⚠️ beware of perf, see next chapter)
- [code] Add the property in the entity and use it
Adding a non-nullable property without default
- [migration] Alter the table to add the column with nullable option
- [code] Add the property in the entity (type hint nullable)
- getter value should return NULL (when fetching old data)
- But ensure new values will not be null (type-hint setter, assert, form validation, …)
- [migration]
- Backfill missing values with opinionated values (⚠️ beware of perf, see next chapter)
- Alter the table and add a not-null constraint if needed (⚠️ beware of perf, see next chapter)
- [code] Remove nullable logic on property and getter
Removing a property/column
Similar to adding a new property, depending on whether the property was nullable or not, and whether the property has a default value or not, the strategy will be different. Because, you first need to stop using this property, but you can not do it until the database allows you to perform insert statements without a required column.
Removing a nullable property
- [code] Remove the property from the code base
- [migration] Alter the table to drop the column (⚠️ beware of perf, see next chapter)
Removing a non-nullable property
- [migration] Make the column nullable or default to an opinionated constant value
- [code] Remove the property from the code base
- [migration] Alter the table to drop the column (⚠️ beware of perf, see next chapter)
Renaming a property/column
You can not rename the column without breaking the code running on production, you need to perform the migration in multiple steps to create a new property and delete the old.
- [migration] Alter the table to add the NEW column with nullable option
- [code] Update the code to insert/update in both columns BUT still read on the old column. Alternatively, you can use a BEFORE INSERT / BEFORE UPDATE trigger for this
- [migration]
- Backfill missing value by using data from the OLD column (⚠️ beware of perf, see next chapter)
- Alter table to add not-null constraint to the NEW column (⚠️ beware of perf, see next chapter)
- [code] Update code to read from the NEW column, and remove usage of OLD column
- [migration] Drop the OLD column from the DB (⚠️ beware of perf, see next chapter)
Can I safely release my code in production?
In order to guarantee non-breaking changes are released, you should set your CI to run the test suite in a backward and forward manner.
Backward compatibility:
The purpose of this test is to assert that the schema of the database in production is compatible with upcoming code modification.
Such CI job would look like:
# set the table schema in the “running production” format
git checkout origin $CI_PROD_BRANCH
composer install
./bin/console doctrine:migration:migrate

# go back to feature branch and run tests
git checkout origin $CI_PULL_REQUEST_HEAD
composer install
./vendor/bin/phpunit
Forward compatibility:
The purpose of this test is to assert that the code in production will be compatible with upcoming schema update.
Such CI job would look like:
# stay on feature branch and setup the database schema
composer install
./bin/console doctrine:migration:migrate

# switch to the “running production” code and run tests
git checkout origin $CI_PROD_BRANCH
composer install
./vendor/bin/phpunit
Do not lock other queries while migrating
Under normal circumstances, the production application is running select queries in parallel. But when a transaction containing a change to the schema is running, in most of the cases, everything else is blocked until the end of the transaction. This can have an impact on the pending query leading to timeout, and thus downtime.
The double impact of ACCESS EXCLUSIVE locks
When altering the schema of a table, PostgreSQL will lock the table to prevent race conditions on concurrent access.
For schema update (DDL), PostgresSQL uses 3 differents locks:
ACCESS EXCLUSIVE: That prevents other DDL changes, but also prevents writes (insert, delete, update) and reads (select).SHARE ROW EXCLUSIVE: That prevent other DDL changes and writes (insert, delete, update), but allows concurrent reads (select)SHARE UPDATE EXCLUSIVE: That prevents other DDL changes, but allows writes (insert, delete, update) and reads (select).
ACCESS EXCLUSIVE | SHARE ROW EXCLUSIVE | SHARE UPDATE EXCLUSIVE | |
|---|---|---|---|
| DDL | ⛔ | ⛔ | ⛔ |
| insert/update/delete | ⛔ | ⛔ | ✅ |
| select | ⛔ | ✅ | ✅ |
The important thing to understand with locks is that a lock prevent the next query from executing, but the operation that asks the lock is also blocked by previous unfinished queries.
So the duration of an exclusive lock is not the duration of the operation, but the duration of the operation plus the duration of slowest currently running queries:
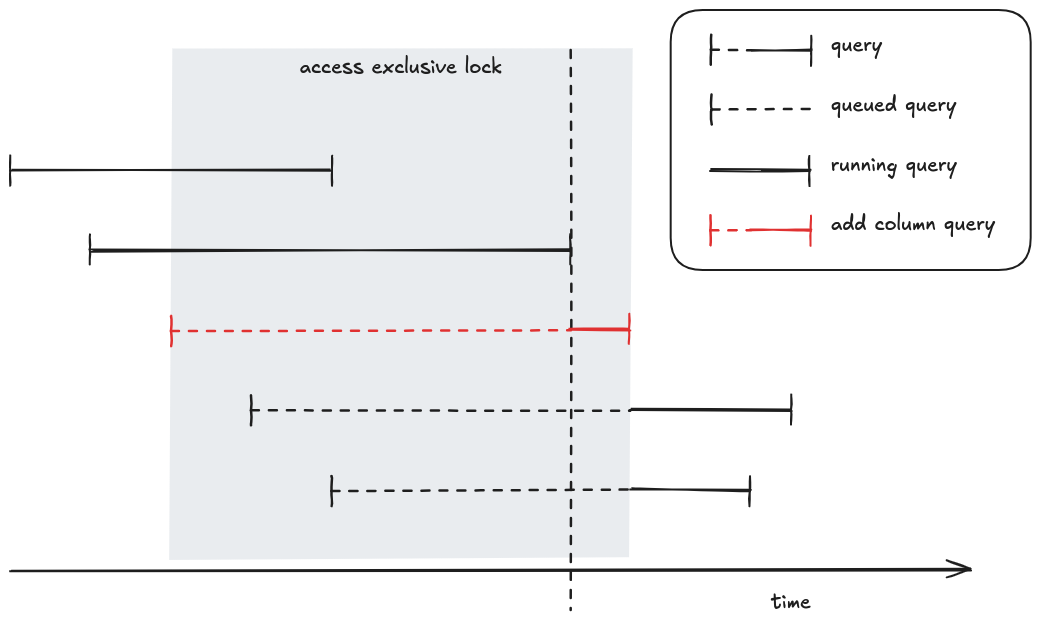
In the above schema, the add column query (in red) requires an access exclusive lock. The query is queued until all previous queries finish, then it starts to be executed and maintains the lock until the end of its execution. During this time (queued time + running time) all following queries are queued.
To safe guard the situation, the best practice is using a lock timeout, which makes the migration fail but prevents impacting the other queries. When the migration fails, it can be retried later.
Also, another thing to keep in mind is that the lock is acquired during the entire transaction. If the migration contains changes on multiple tables, or even multiple changes, it’s safer to split the migration into multiple individual transactions. This will release the lock between each step and reduce the chance of deadlocks.
Is it a fast or slow operation?
Some operations just update the catalogue (internal schema) of the table, and are fast. Having an ACCESS EXCLUSIVE lock during this situation is acceptable.
But some operations require rewriting data on all tables or perform a full table scan which are slow. Having an ACCESS EXCLUSIVE lock should be avoided in these situations.
To prevent locking the table for too long, you can split the operation into multiple queries and each query could acquire a ACCESS EXCLUSIVE or be slow, but not both.
Run in multiple transactions
Because locks are acquired and maintained during the entire transaction, when your migration executes a query that requires a lock, the lock will be maintained until the execution of the last query and the COMMIT/ROLLBACK. Therefore, you should split the query in multiple transactions. Beware in case of failure and retry of the migration, when the migration contains multiple queries, some of them might have been committed, and some not. So your migration should be able to recover and skip previously executed query.
An alternative is to split your queries in multiple migrations. In that way each migration contains a single transaction and won’t be replayed.
⚠️ Updating / Inserting / Deleting a lot of rows
If you need to change a lot of rows, split the job in multiple chunks and execute each chunk in an individual transaction. This will prevent locking the table for too long.
while (true) {
    BEGIN TRANSACTION
    UPDATE customers SET location=’france’ WHERE id IN (
        SELECT id FROM customers WHERE location IS NULL LIMIT 1000
    )
    COMMIT
}
⚠️ VACUUM (FULL)
The command VACUUM and VACCUM (FULL) clean up rows that have been marked as deleted.
The first one (VACCUM) allows future reuse of the freed space without locking the table, but keep space on the physical disk.
The second one (VACCUM (FULL)) is more aggressive and physically compacts the database files. The operation might recover a lot of space on your physical disk, but the operation is extremely slow and requires an ACCESS EXCLUSIVE lock
Therefore, never run VACCUM (FULL).
Creating a table
Creating a table is fast and requires a SHARE ROW EXCLUSIVE lock.
Dropping a table
Dropping tables use ACCESS EXCLUSIVE lock, and requires to delete files on the FileSystem which should be acceptably fast
⚠️ Adding, Dropping, Reindexing an INDEX
Manipulating INDEX uses a ACCESS EXCLUSIVE lock and has to scan the full table and write index which can be slow.
When possible you can use the CONCURRENTLY option. The query will be slow but use a SHARE ROW EXCLUSIVE lock instead of ACCESS EXCLUSIVE lock.
CREATE INDEX CONCURRENTLY…
Adding a COLUMN
Adding a column uses an ACCESS EXCLUSIVE lock.
Adding a COLUMN without default or constant default
If the column does not have a default value or uses a constant default, the operation is fast.
⚠️ Adding a COLUMN with volatile default
If the column has a volatile default value (i.e. clock_timestamp), the operation requires updating all the existing rows, which can take a non-negligible time. You should split the operation into multiple transactions
ALTER TABLE table ADD COLUMN nameALTER TABLE table ALTER COLUMN name DEFAULT=’clock_timestamp()’WHILE (true) UPDATE table SET name = clock_timestamp() WHERE name IN (SELECT … LIMIT 1000)
Alter COLUMN (nullable, default)
We are not talking about changing the type of value that is required to convert and rewrite all the rows, here we’ll focus on adding/dropping nullability or default.
This operation uses an ACCESS EXCLUSIVE lock.
Drop null or Drop default
Super fast, it just updates the schema of the table.
SET default
This operation is fast because, opposite to the ADD COLUMN statement, this operation does not update previous lines, it just sets a default for the new insert lines.
⚠️ SET NOT NULL
There is a caveat here, because postgresql will perform a full table scan to check if there is no null value in the table. Instead you should add a (temporary) not valid constraint that will be used by PostgreSQL to skip the table scan when altering the column, then validate the constraint using a SHARE UPDATE EXCLUSIVE lock.
ALTER TABLE table ADD CONSTRAINT check_name CHECK (name IS NOT NULL) NOT VALIDUPDATE table SET name = … WHERE name IS NULLALTER TABLE table VALIDATE CONSTRAINT check_nameALTER TABLE table ALTER column SET NOT NULL
⚠️ Drop COLUMN
Dropping a column uses an ACCESS EXCLUSIVE lock. The operation by itself is fast, but PostgreSQL first need to drop all indices which can be slow. So drop indices using the CONCURRENTLY option first
DROP INDEX CONCURRENTLY …DROP INDEX CONCURRENTLY …ALTER COLUMN table DROP COLUMN name
⚠️ Adding a ForeignKey constraint
ForeignKey operations use “SHARE ROW EXCLUSIVE” lock on both tables (the source and the target).
It requires a full table scan to assert all reference keys exist on both sides. To reduce the lock duration, you can use a (temporary) NOT VALID constraint, then validate it. The validate operation will use a SHARE UPDATE EXCLUSIVE lock
ALTER TABLE table ADD CONTRAINT name FOREIGN KEY … NOT VALIDUPDATE table SET name = … WHERE name IS NOT IN (SELECT DISTINCT ref … FROM …)ALTER TABLE table VALIDATE CONSTRAINT name
Summary
| SLOW | ACCESS EXCLUSIVE | SHARE ROW EXCLUSIVE | SHARE UPDATE EXCLUSIVE | |
|---|---|---|---|---|
| Create table | ✅ | |||
| Drop table | ⚠️ | ✅ | ||
| Add column null | ✅ | |||
| Add column default constant | ✅ | |||
| Add column default volatile ⛔ | ⚠️ | ✅ | ||
| Alter column default | ✅ | |||
| Drop column without index | ✅ | |||
| Create index ⛔ | ⚠️ | ✅ | ||
| Create index CONCURRENTLY | ⚠️ | ✅ | ||
| Drop index ⛔ | ⚠️ | ✅ | ||
| Drop index CONCURRENTLY | ⚠️ | ✅ | ||
| Alter column drop not null | ✅ | |||
| Alter column add not null ⛔ | ⚠️ | ✅ | ||
| Add constraint ⛔ | ⚠️ | ✅ | ||
| Add constraint NOT VALID | ✅ | |||
| Validate constraint | ⚠️ | ✅ | ||
| Add FK | ⚠️ | ✅ × 2 | ||
| Add FK NOT VALID | ✅ × 2 | |||
| Add constraint unique using index | ✅ | |||
| Alter column unique ⛔ | ⚠️ | ✅ |