How to automate load tests with Gatling


When I was on your side of the keyboard, developing cool and funny applications (more or less :D), load tests were (most of the time) executed a few days before going live. We sometimes discover rabbits in the hole, doing too much stuff, and then, we switch to firefighter mode to solve all of the issues. That was not a great experience.
All applications should be load tested, from the beginning and along the way, as a default. We will see in this guide how to set up your Upsun project for running automatic load tests on each push on your Upsun preview environments.
In this article, we’ll add an Activity Script integration, that will in turn call a runtime operation, which will then execute a Gatling simulation to load test our environment. Gatling CORP is a french company and they provide tools to load test your application, with two versions of their product: a Community (free) and Cloud (Enterprise) version of their product.
Note:
If you want to learn more about what and why it is important to load test your application, please see this blog post from Peter Dukta (Gatling), you will find everything you want.
Gatling and load tests
Assumptions:
- You already have a project hosted on Upsun.
- You have the Upsun CLI installed.
Install the Javascript SDK
First step is to install the Javascript SDK from Gatling documentation. To install it locally, run the following commands:
wget https://github.com/gatling/gatling-js-demo/archive/refs/heads/main.zip
unzip gatling-js-demo-main.zip
mv gatling-js-demo-main gatling
rm -Rf gatling-js-demo-main.zip
git add gatling && git commit -m “Add Gatling SDK”
Install dependencies
To install Gatling libraries during the build hook, add the following in your .upsun/config.yaml file:
applications:
  app:
    mounts:
      # ...
      "/.gatling": { source: storage, source_path: "gatling" }
      "/.cache": { source: storage, source_path: "node-cache" }
      "/gatling/javascript/target": { source: storage, source_path: "gatling-target" }
    hooks:
      build: |
        set -x -e
        # ...
        cd gatling/javascript
        npm install
        npx gatling install --gatling-home $(pwd)
Then add your config.yaml file to your Git history:
git add .upsun/config.yaml && git commit -m "install Node + Gatling dependencies"Define a simulation
Create a new gatling/javascript/src/myfirstsimulation.gatling.js file with the following source code:
import {scenario,simulation,constantUsersPerSec} from "@gatling.io/core";
import {http} from "@gatling.io/http";
import { getParameter } from "@gatling.io/core";

const uri = getParameter(
   "uri", // Dynamic uri of your preview environment
   "localhost" // Default value for your local testing (optional)
);

export default simulation((setUp) => {
   // Add the HttpProtocolBuilder:
   const httpProtocol =
       http.baseUrl(uri)
           .acceptHeader("application/json")
           .contentTypeHeader("application/json");
   // Add the ScenarioBuilder:
   const homepageScenario = scenario("Scenario Homepage")
       .exec(http(uri).get("/"));

   // Add the setUp block:
   setUp(homepageScenario.injectOpen(constantUsersPerSec(2).during(60))).protocols(httpProtocol);
});Then add your myfirstsimulation.gatling.js file to your Git history:
git add gatling/javascript/src/myfirstsimulation.gatling.js && git commit -m "Create Gatling simulation"Get environment URI
To dynamically get the current environment URI, from the PLATFORM_ROUTES environment variable, you can use an .environment file that will dynamically build it.
Create a new .environment file, at the root of your application with the following lines:
export URI=$(echo $PLATFORM_ROUTES | base64 --decode | jq -r 'to_entries[] | select (.value.upstream == "app") | .key')Then add this .environment file to your Git history.
git add .environment && git commit -m "Add URI envVar"Define runtime operation
Runtime operations allow you to trigger one-off commands or scripts on your application (preview) container. We will then be able to execute it using an Activity script integration.
Update your .upsun/config.yaml file with the following:
application:
  app:
    operations:
      gatling_myfirstsimulation:
        role: admin
        commands:
          start: |
            if [ "$PLATFORM_ENVIRONMENT_TYPE" != production ]; then
              cd gatling/javascript
              npx gatling run --simulation="myfirstsimulation" --gatling-home $(pwd) uri=$URI
fi npx gatling run command has a uri=$URI parameter, using the previously created URI environment variable.Then add your .upsun/config.yaml file to your Git history.
git add .upsun/config.yaml && git commit -m "Add Gatling runtime operation"Create activity script
Create a new Javascript file (our Activity script file) at the root of your source code, gatling-worker.js (source here) with the following command line:
curl -L https://raw.githubusercontent.com/upsun/snippets/main/src/gatling/gatling-worker.js > gatling-worker.js
git add gatling-worker.js && git commit -m "Add Activity Script gatling-worker.js"
upsun push
This activity script uses an API Token, as an environment variable, to connect to the current environment and execute the previously defined runtime operation using the Upsun API. We need to define this environment variable for the integration of our activity script, and later add an API Token environment variable.
Add integration
Let say we would like to load tests our environment, each time we push new source code on it (corresponding event is environment.push).
upsun integration:add --type script --file ./gatling-worker.js --events environment.push \
--states complete --environments *--events event1,event2,... option.API tokens
First, get the previous integration ID using the following command:
upsun integration:listThen, create a new API Token from the Console, keep the value in your hand, and replace it in this terminal command:
upsun project:curl /integrations/<INTEGRATION_ID>/variables -X POST \
-d '{"name": "api_token", "value": "<API_TOKEN>", "is_sensitive": true, "is_json": false}'<INTEGRATION_ID>and <API_TOKEN> with the corresponding values previously createYou can verify that the variable has been created with this command:
upsun project:curl /integrations/<INTEGRATION_ID>/variablesTime to test
To test it, create a new feature branch and push an update to your preview environment, you will see an activity script event that will contain logs of your load tests.
When opening the log of the gatling_myfirstsimulation runtime operation, you will see the full load test report.
Online report
At the end of this report, you will see that Gatling simulation generates a local HTML report to get the full view of the simulation.
Reports generated, please open the following file: file:///app/gatling/javascript/target/gatling/jssimulation-20240912123722990/index.htmlTo allow remote access to this HTML report file, you just need to allow a new routes by adding a new web.locations rule to your application.
To generate in your report the corresponding report url, you will also need to change your runtime operation to display it.
In your .upsun/config.yaml file, update the following:
applications:
  app:
    web:
      locations:
        #...
        "/gatling":
          root: "gatling"
          passthru: true

    operations:
      gatling_myfirstsimulation:
        role: admin
        commands:
          start: |
            if [ "$PLATFORM_ENVIRONMENT_TYPE" != production ]; then
              cd gatling/javascript
              echo "Gatling simulation myfirstsimulation in progress, please wait."
              return=$(npx gatling run --simulation="myfirstsimulation" uri=$URI --gatling-home $(pwd))
              echo "$return"

              # adding online link
              filepath=$(echo $return | sed 's/.*file:\/\/\/app\///')
              echo "To access online report, follow this link: $URI$filepath"
            fi
Then deploy this change:
git add .upsun/config.yaml && git commit -m "adding Gatling web rule" && upsun push -yWhen deploy is finished, you will find, at the end of the runtime operation logs, the generated url of your Gatling load test report and you just need to copy/paste it to your browser, something like:
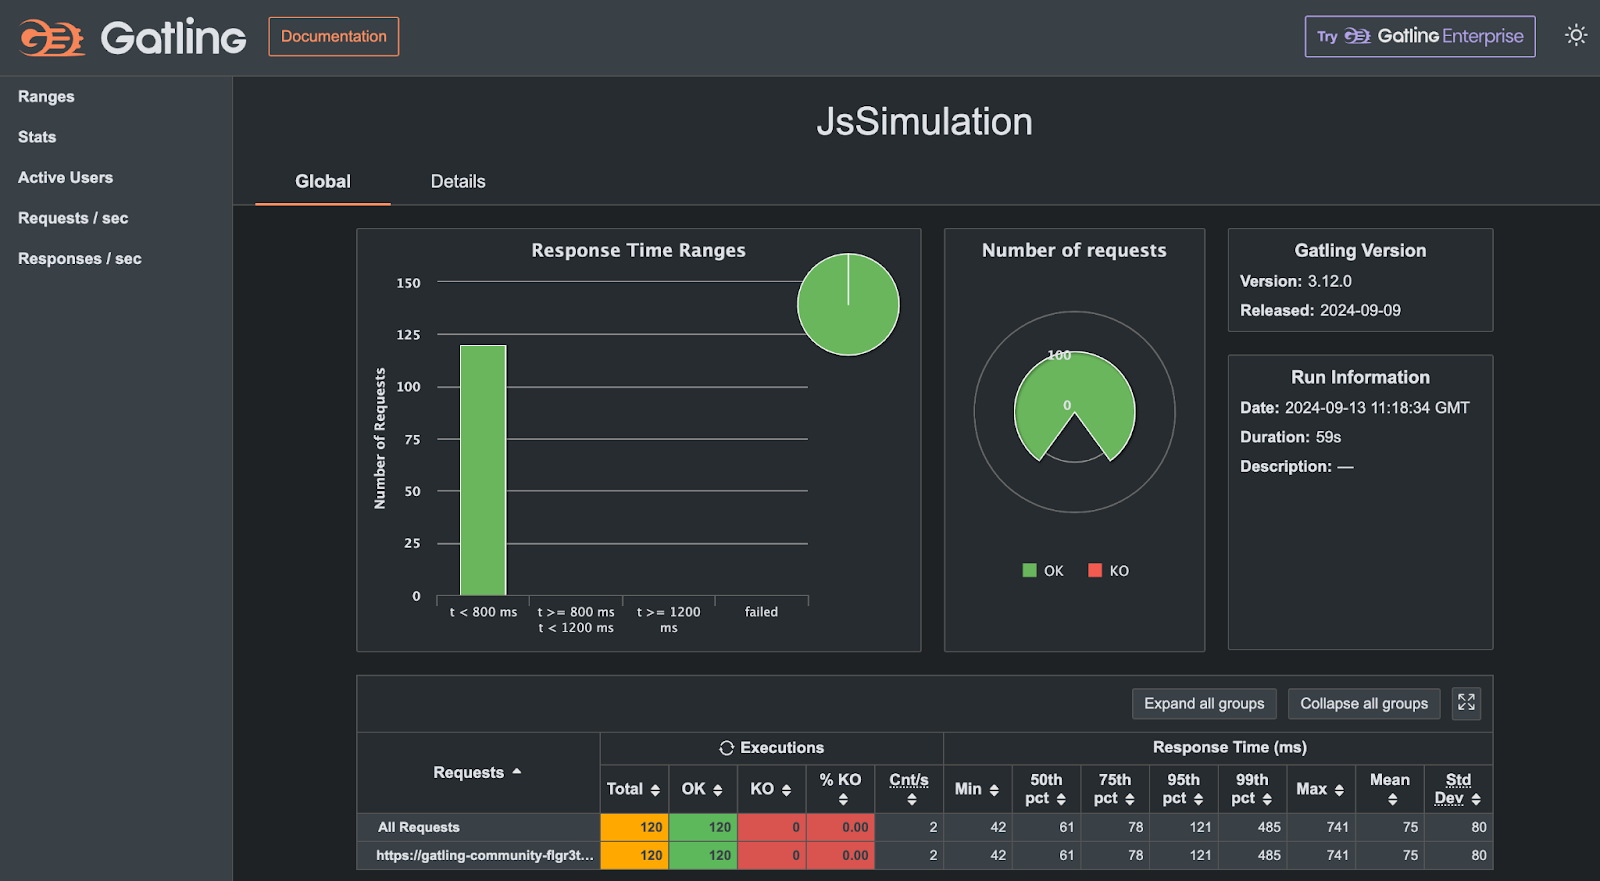
Gatling Community Edition view, running on an Upsun environment at /gatling, showing response time ranges for 120 requests to the homepage as defined by simulation myfirstsimulation.
Troubleshooting
If during deployment, when installing Gatling, you get an error telling that the process has been killed, this means that your container is not having enough RAM.
2:22:54 PM Downloading GraalVM Community Edition 22.0.2 to /app/.gatling/tmp/download/graalvm.tar.gz
Unpacking GraalVM to /app/.gatling/graalvm/22.0.2
W: Killed
As the Gatling javascript SDK is using Graalvm JDK to run load tests locally on the application container, resources (RAM) needs to be adjusted.
By default, PHP containers use a HIGH_CPU container profile, which means 0.5 CPU and 224MB of RAM.
We need to increase the allocated RAM by updating the container profile of our application container to BALANCED (0.5CPU & 1088MB RAM)
applications:
  app:
    #...
    container_profile: BALANCED
Conclusions
Load testing your application is crucial if you are running applications with a lot of traffic spikes or if you’re facing TV show effects.
In this guide, we took a look at how to set up an on-demand set of load tests with Gatling community edition that could be triggered (and observed) on a new Upsun preview environment using a runtime operation. Some next steps could include automatically triggering these operations when preview environments (merge/pull requests) are opened.
An additional caveat to consider is that load testing in this way – running Gatling within Upsun application containers – will consume resources in your projects. In a follow-up posts, we will see how to use the Gatling Cloud (and so, external resources) to run load tests.
Remain up-to-date on the latest from us over on our social media and community channels: DEV.to , Reddit , and Discord .